Displaying Database Entries with SQL SELECT
Setup
In the same fashion as the previous exercise, create a dedicated folder for a new exercise and create index.php. One may reuse the same Visual Studio Code workspace and create a new folder next to the old one, as illustrated below.

As this exercise primarily focuses on PHP-MySQL integration, we will leave styling and layout customization until the end.
Modules
Now that we are familiar with the concept of modularization, we can create a number of new module files, each with a distinct purpose:
sql.php: Establishing connection to SQL serverlist.php: Listing all available database entriesview.php: Displaying one selected database entryform.php: Generating form layout for user submissionpost.php: Taking provided data fromform.phpand pushing to database
Upon successfully generating the above files, set them in the index.php file's <body> section in the following sequence:
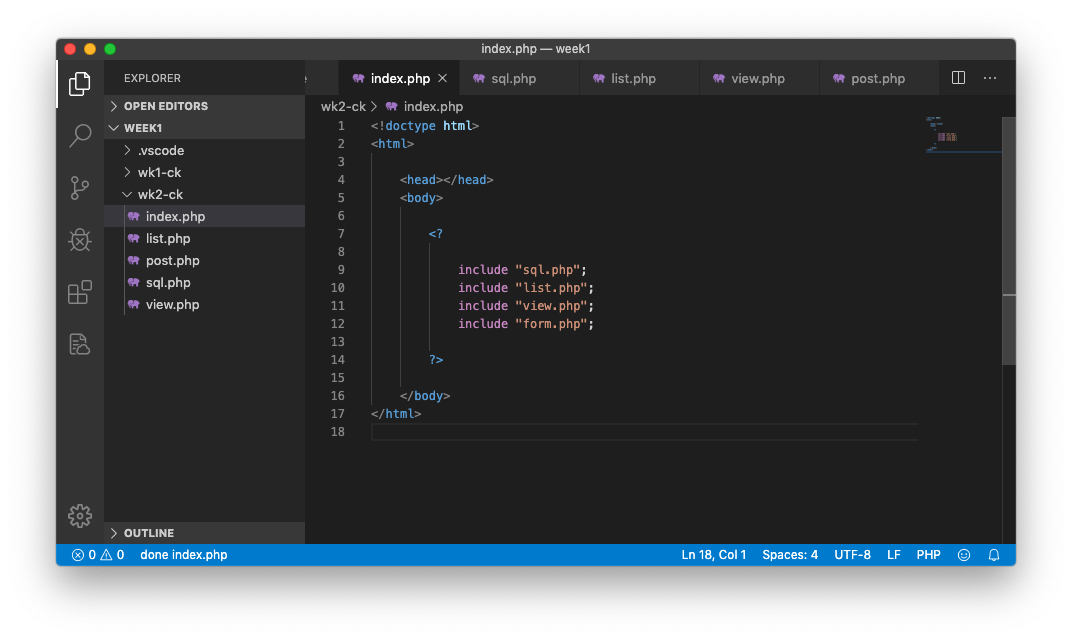
index.php
<!doctype html>
<html>
    <head></head>
    <body>

        <?
            include "sql.php";
            include "list.php";
            include "view.php";
            include "form.php";
        ?>

    </body>
</html>
post.php does not belong here, as that is a separate script that will be called by form.php later on.
Connecting to SQL
sql.php is responsible for authenticating and making a persistent connection between MySQL and PHP, so that we can send our command, retrieve the data, and push to the HTML and the browser.
sql.php
<?

    $server = "localhost";
    $username = "ocad";
    $password = "csdm2n15";
    $dbname = "ocad";

    $conn = new \mysqli($server, $username, $password, $dbname);

    echo $conn->stat;

?>
The above script sets up a total of 4 simple variables, each representing a piece of information required to connect to the server database. In the next line, we ask PHP to take this information and make a live connection to the database.
If everything goes well, the subsequent line echo $conn->stat; will display information about the SQL server:
Uptime: 411215 Threads: 2 Questions: 780729 Slow queries: 0 Opens: 1799 Flush tables: 1 Open tables: 416 Queries per second avg: 1.898Upon verifying successful connection, delete the last line from the code (echo $conn->stat;).
Listing Entries from Database
With the new $conn variable representing the connection to the database, we can now move to list.php to start listing all available entries:
list.php
<?

    $query = "SELECT * FROM posts ORDER BY title ASC";
    $result = $conn->query($query);

    echo $result->num_rows;

?>
We are looking to retrieve all columns from all available entries, but also order by title information (in an ascending order). One can go ahead and create a variable that contains the SQL statement. Afterwards, we are requesting our $conn variable to send in the query. All returned data will be saved to another variable called $result.
The last line displays us how many rows of data were retrieved as part of this process. If the number is displayed and the number is larger than 0, this line of code can then be removed.
We are now ready to use loop to go through the list of posts and display it using echo or (<?= and ?>). In addition, we are going to introduce some HTML in this loop for a higher level of customization.
list.php
<?

    $query = "SELECT * FROM posts ORDER BY title ASC";
    $result = $conn->query($query);

?>

<div>

    <? foreach ($result as $index => $row) { ?>

        <h1>
            <a href="?id=<? echo $row['id'] ?>">
                <? echo $row["title"] ?>
            </a>
        </h1>

    <? } ?>

</div>
Note that the code closed the first PHP code snippet, opened a <div> element, and opens up another PHP code snippet with the first half (missing the closing brace) of forloop mechanism. It is quite important to note that the second half (aka closing brace) is located right above the closing tag </div>.
This means that everything that falls between the two braces will repeat multiple times: to be precise, the same number as the entry count from the database.
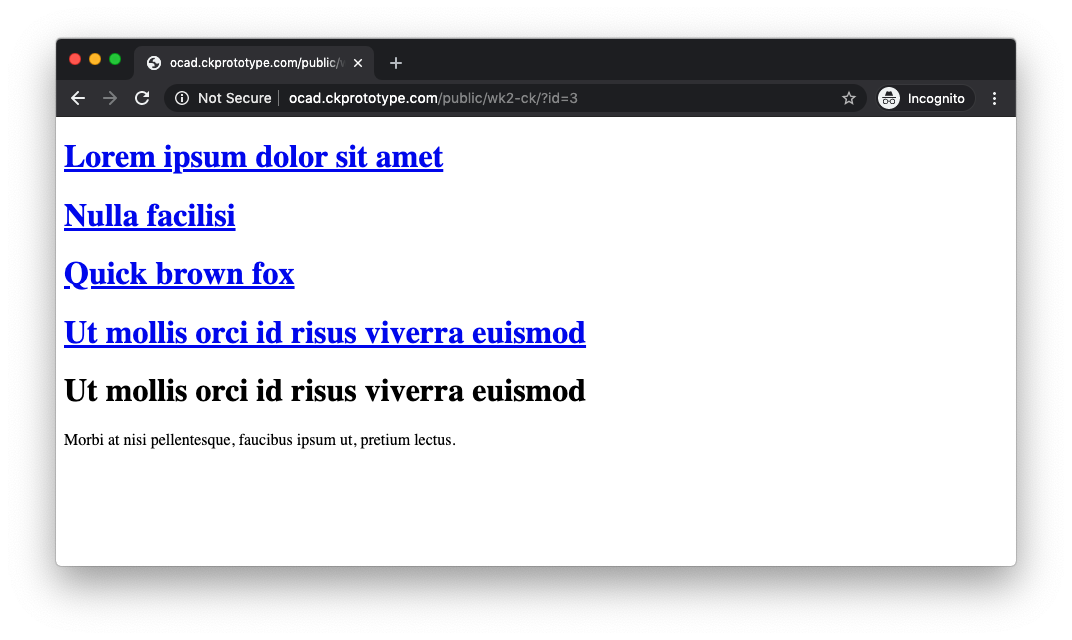
In order to test this, one can place an HTML element, with references to individual columns pulled from each entry. Note that we are looking to create a hyperlink (wrapped around by h1) that uses the title column as a label, and id as a part of the URL that the user is redirected to upon click.

The result is a satisfactory one: the entire database is displayed here (although only displaying the title field), and upon clicking on one of the links, the browser redirects back to the page itself, but with a small addition made to the address bar. This valuable piece of information allows us to modify our SQL query for view.php.
Displaying a Single Database Entry
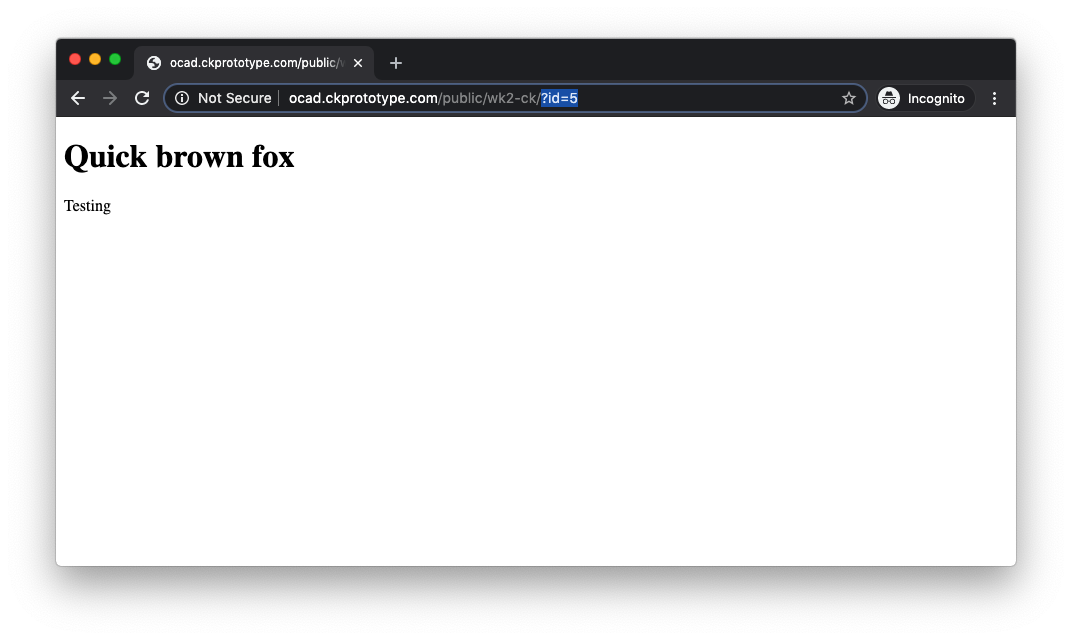
Now that we are feeling more confident with SQL SELECT, we can move onto displaying one specific entry that the visitor has selected. We can copy the entire contents of list.php into view.php, and make a few modifications:
view.php
<?

    $id = $_GET["id"];
    $query = "SELECT * FROM posts WHERE id = $id ORDER BY title ASC";
    $result = $conn->query($query);

?>

<div>

    <? foreach ($result as $index => $row) { ?>

        <h1><?= $row["title"] ?></h1>
        <p><?= $row["content"] ?></p>

    <? } ?>

</div>
There are a couple of updates here:
- In the top section, we are creating a new variable called
idwhich pulls from the user's address bar - We are modifying our
queryvariable to add aWHEREclause. - We are updating the HTML entry that sits between the two braces, so that we can remove away the hyperlink and pull
content.
We now have both list.php and view.php performing their respective functions: list.php continues to list all available entries, while view.php simply displays the user-selected article.
Conditional Display
One may choose to hide away the list.php module when the user has selected a specific article, and we can achieve this by using a conditional statement in index.php.
<!doctype html>
<html>

    <head></head>
    <body>

        <?

            include "sql.php";

            if ($_GET["id"] == "") {
                include "list.php";
            } else {
                include "view.php";
            }

            include "form.php";

        ?>

    </body>
</html>
We can write a conditional statement that checks to see if the user has provided a proper id parameter in the address bar. There are two outcomes:
- If
idis empty (or does not exist), uselist.php - If
idis not empty, useview.php
The result is as expected: upon selecting a specific article, one can verify that list.php module hide away.